Sunday, August 05, 2007

Weld through spray


I use a weld through spray made of zink as protective layer before I weld the double layer metal together. I dont know how effective this is, but I intend to use some sort of undercarriage spray to penetrate between the metal sheets after painting the car. But I cant understand anything else that this is a rust trap how you do it, if it's supposed to look factory stock. Next time I will weld the NOS support metal for the rear bodymount.

Closing the rear end


The rear end of the heater channel has a distinctive profile. Luckily the outer panel was intact so I had to make the inner part. This was also timeconsuming, and had to be made in three pieces. I was looking to get good solid welds, because this is a very exposed area on the car. It all turned out Ok at last. Final grinding is still necessary to make it lokk satisfying. I also remebered in the last second to add the new mounting nut for the running board before closing the channel.

Closing the corner


It's always a little tricky to make ends meet (not only economical) and make things look right. To remove all evidence of rust and make fresh metal meet in every corner, I hade to make som new small pieces in the intersection between the heaterchannel and the inner wheel well. This proved to be difficult as the piece had double curves. It would have been nice to have a leather bag to punch against, but with some improvisation it fit at the end. It's both good and bad to know there is just a similar corner left =) I know how it's done, but also how much work there is behind it.

Wednesday, July 11, 2007

Veng? Who??


The next step was to fabricate a new piece of inside channel with the correct profile. Fürsten had a sample laying in the work shop, so I used this to find the shape. And it turned out perfect =) Now the alignment was close to perfect, but the corner was far from solid. Making the rounded piece around the heater tube was no easy task. But after a little trimming and adjusting, the pieces fell together. After welding everything up, it felt more solid and looks straight. It's probably forgivving to weld on a VW T1, as many of the lines on the lower body can be meassured out from straightlines, and nearly everything has the flat bottom of the car as a reference point.

I decided after starting the welding that the Veng part was no option in this corner. The shape was not anything near the OG shape. So I wnt for a total fabrication of the pieces myself. And it turned out better than expected. I had to skip the dimpeled part with the two holes for the bodymount, but in my eyes this is a small detail missed compared to welding in the Veng part with totally wrong shape. Maybe I can fabricate the the correct profile after everything is welded in place?

Puzzle with alignment


With so much metal removed, it is a challenge getting the corner in the right position again. It was no way around cutting away all this metal, to have solid material to weld into. I started with fabricating the outer channel side, and made sure to keep the draining holes intact, and got the height of the channel sitting right. The next step was cutting a Wolfpart bottom to fit, and tack it togheter carefully. Then I extended the last piece of the cross member, and meassured the hight to be as good as it could be at this time...

More rust


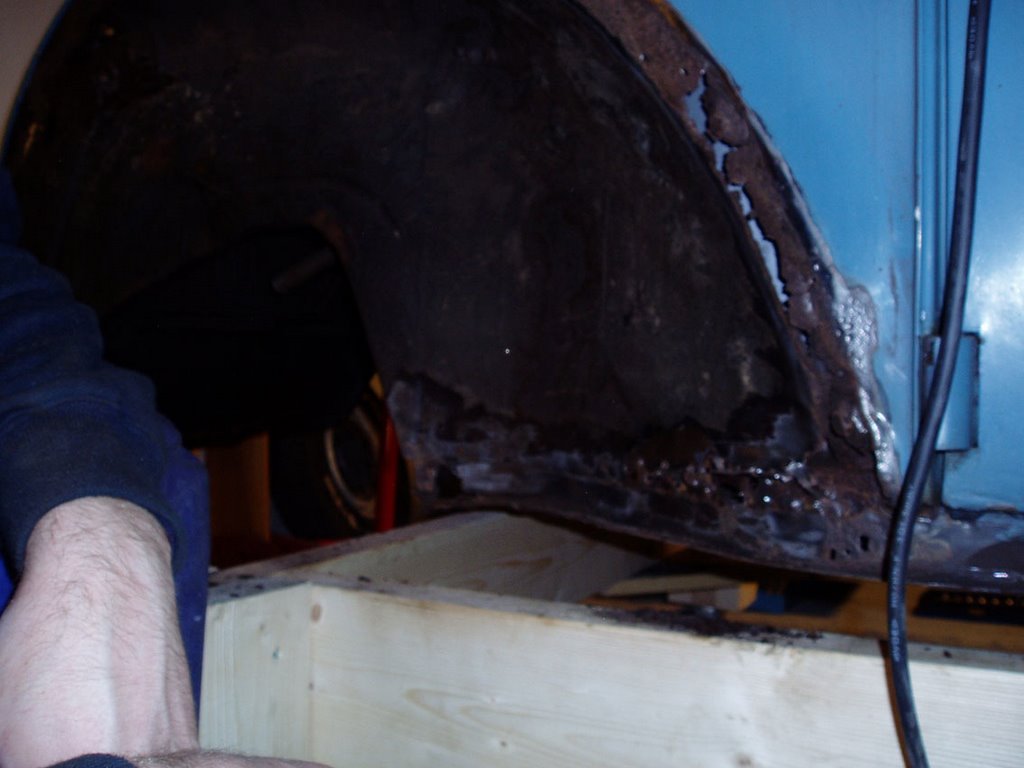
The rear end of the riht heaterchannel is a sad story... Quite much of this corner has to be removed, and there will be a problem finding the reference points again. After making the nessecary cuts, it became quite spacious back there =)

Thursday, July 05, 2007

Trial fitting


Then it was time to try fitting the NOS part.. and wow, it "fit like a glove". The quality of the metal and the accurate fit is amazing... far from the repro pieces you buy today. Now it's just grinding down the weld underneath and rustprime the first layer of sheet metal. And then spotweld the new panel in place. I must admit it feels good to know how solid this corner of the car is becoming =)

Making a new part


The new innerwing plate was made out of sheet metal and cut to fit... The curved area had originally a nicely rounded edge. I hammered that out and it looked quite like the original panel. In the picture a little adjustment of the curve is still needed. The sheet metal was butt welded, and after changing from 0,6 to 0,8 mm thread in the welder, it went a lot easier.

Removing the rot


The rotted area was almost as big as the new welding plate, so I decided to make the cut in a way that most of the welding are covered by the outer plate when finnished. The edge of the rear compartment area was all good...

Re-using the bracket


Luckily the bracket was pretty good, and I think sandblasting it and remake the reinforcement will make it good as new. There are pretty much work to recreate all these details... Always a little more than you think...

Rear bodymount


After visiting Bad Camberg, the spirit to finnish the zwitter was back again. Sourcing som good NOS welding parts made the job more greatful. I started to drill out the spotwelds on the existing bodymount with the backplate, because some rust was showing through. After removing the 3 layer plate, a LOT of rust came foreward....

Collecting pieces


The choice of VW happenings to visit this summer was Bug Run in Sweden and Bad Camberg in Germany. They both have a swap meet, and the the best in each division. Bug Run swaps are the best in Scandinavia, and the BC is world class. Even on a limited budget, due to house building, I managed to track down some items for the zwitter that I have been looking for.

In the "pile of shit" are for example a KDF fanhouse plate, a NOS vdo fuelgauge with sender, a Störk temperature gauge, OG brakefuel reservoir w/floater, NOS welding parts, OG zwitter bonnet handle, and some split rubber "hard to find".... And some other "juggel" that may be used for the car...

Friday, June 15, 2007

A new assistent


It has been a couple of months with little progression on the Zwitter. Most due to other projects as the Kvikk engine for the "Rallye-bug" and other tasks in the workshop. Some of the time is used to collect and sort out parts as well. Some of the things purchased this spring, was a new assistent for the shop. This will be very helpful when all the pieces of the car is going back together. It's great to be organized. The Hazet assisten is from the late 60ies as far as I can sort out. It's in great condition, and of course it will stay with it's original paint and patina =)
Hopefully this assistent will help speeding up my project.... (Before and after pictures)

Thursday, April 12, 2007

A lot of air


This picture helps to make the decision of using danish steel even easier =)

Rear right corner


This is far whorse than the left rear corner. Nothing is left of the rear corner, and heavy surgery is needed. To get to the rusted area, the heater tube under the rear seat had to be removed. I cut it in a way that the top cover will hide the welding when finnished. The job now is to find out where to cut and replace with fresh metal. Here I see no other way than to use some danish metal to replace the rusted area. It's to huge for me to create, as there are few ends to meassure from.

Starting out back


Some exitement was certainly present when it came to removing the rear fender. After struggeling with both the front fenders, I expected nothing less here. But surprisingly it seemed that all the bolts and the fender had been removed at some point before, and the bolts could be removed by hand.

Right front corner


Some progression is visible on my project, but not as much as hoped. But the timewindow for this car is wide, and I'm in no hurry. Bulding piece by piece, the front end is becomming more solid each day. The regulator on the welder broke last nigt, so I didn't finish welding the last two pieces of the corner. But there is only filling of spotwelds and grinding left before anti-rust treatment and painting.

Sunday, March 11, 2007

Backside of the medallion


After inspecting the backside of the H-apron, it seemes to be quite some work needed to make this baby shine again =)

Saturday, March 10, 2007

Nice ass


A well formed rear end is never wrong in any way. The rear apron of a classic beetle is no exeption. As seen in the pictures posted on the zwitter, the car had a modern rear apron mounted at some point. This will of course be changed for the well known H-apron. These are not easy to come by, and to find an uncut example is almost impossible. Repro versions are on the marked, but there is always something about the real thing. After a tip from Fürsten, I collected a H-apron last night, although in a cut version. Having no experience in restoring this piece, it looks possible to reverse it back to a solid apron. Some pictures of the operation will follow.

Thursday, March 08, 2007

Inside right side


On this side I did a little twist to the welding of the ouside channel. Because it was more solid than the other side, I made a more solid overlap weld. As you see in the pictures, there are still some pices to make.

Wednesday, March 07, 2007

Repeating procedures


To get the corner aligned again, I used measuring points from the other corner to get the pieces right. I started with the outer channel, and the cut the bottom part and tack welded it in place.

Corner nr. 2


The right side corner of the front heaterchannel, was even worse than the left. After cutting out the rusted pieces, there was not a lot of intersection points left. On this side the front wall was rotten on the underside all the way up.

And wholaaa...


Sometimes it's better to act than think to much... In this case the result came out better than expected. Porsche sparewheel wide 5? Formel-Vee? Classic racing? E-bay?

Thursday, March 01, 2007

Struggling through


It's surprisingly not the funniest job at all times to weld, weld and weld... To get inspiration to start again, day after day on removing rust, it's important to have some visions of the project.

And a very important issue of a project is the wheels. I have many ideas in my head, and one of them is spinning around the wheel shown in the picture. This is a 911/912 Porsche wheel, and would fit an outlavws car quite nice... keep on dreaming =)

The outside corner


Here is the result of the outside corner. It may not be professional, but with some sealing of the welding and grinding of the surfaces, the result will be good enough to last another generation. I think the most important procedure will be the rustproofing inside the channels. This frontpiece welded in, will be exposed for hard conditions, and therefore I painted it with "weld through" paint on the inside of the channel.

The next corner


Hopefully the tricky parts will be easier to make on the next corner. Can you spot the intersection point on this corner? It's not easy to make these parts without measuring from a other car. Buying the channel bottoms from Wolfparts has been great help. Just three more corners to go.....

The first complete corner


The extention of the front wall and bottom piece, was a tricky part to make. But after several cardboard models and testing, the pieces seemed to fit. Of course it's easier to make the cardboard models when you have two splits to compare it to. After adjusting a little bit, the final piece was welded in. And then we have the first corner of the car rock solid. A little more welding and grinding needed to get the paint-ready finnish.

Towards a personal milestone


It has proven to take some time and skill to weld up the heaterchannels to look as good as stock. After fitting the heaterchannel bottom last time, the contour of the corner came back. First step was to extend the front side of the front wall, and to make and weld in the inner channel.

Thursday, February 22, 2007

Front corner


At last I got some speed on the welding again. During one evening I managed to finish up the inner wing and started working on the heatercahnnel. I replaced the bottom part with goods from Wolfparts, and made the rest by papercutting and fitting before welding. The bottom and outer side of the left channel are now OK. Just some grinding and welding needed to finnish it up. A good feeling to se things look like new again =)

Thursday, January 25, 2007

Strange things


Some new strange things about the zwitter appears for each time I look at it. Yeasterday I discovered that the when the car was rear ended, the fanhousing smashed into the firewall and made a dent. It popped out just by pressing it. Somehow the car doesnt seem to have suffered from it in other ways than body parts replaced on the rear.

Piece by piece


After a very satisfying session on the "El-capitan", I managed to make another welding piece for the front inner wing. The technique is improving, and it's showing in the details and tempo. The weakest link at the moment is the welding equipment, and for next welding session I think the welding-gas is bought in, and the powder-thread put on the shelf. I'can in some way see some kind of end to it now. Hopefully the welding is done by the summer.

Monday, December 18, 2006

Building up


I have a philosophy that it's smart not to cut the whole car to pieces before weldig it up again. Therefore it was satisfying to spend an evenening with the welder at last. My goal is to save as much as possible from the original car, instead of turning it into a danish "Veng-car". It didn't take much time before I saw the results of that. Welding into metal that containes small spots of rust, is not easy. The welded parts will probably not be as solid as new, but on the other hand didn't Wolfsburg treat the body against rust attacks. So with "nearly as new" welding, and modern chemical treatment, the car will last at least 50 years more. Being a "freshman" on welding, quite a few lessons were learned the first evening =)

Tuesday, December 05, 2006

Crackers


Removing the other front fender was quite easy, because most of the bolts followed the feder off the car. This side had the original cloth band between the fender and body. This side looked a lot worse, and some more extensive repair work is needed here. The picture show what needed to be cut out for a beginning, but the whole area underneath the fender mounting zone is all eaten up.
With good tools and a good attitude, this should be fun welding up =)

Thursday, November 23, 2006

Hipp, hipp hurray....


Not everybody would choose to celebrate their birthday in a garage. But just beeing an Outlavws member, already tells that I'm not "everybody". Powertools in combination with good friends, make the perfect surroundings for a perfect day. I must say that working on MY split window beetle in our new garage, is a dream come through. Sitting on a chair, in room temperature, whith all tools sorted on a worktable, is reason enough alone to celebrate. It's a real dream come through to whorship your hobby in these conditions, rather than sitting on your knees in thermoclothing outdoors in november. 31 years, the average age of a 1303... Really puts things in perspective =) (Thank you to the photografer for catching me in a good moment)

Attacking the front corner


After removing some welding nuts and making new threads for the front wing, I was ready to start on the heaterchannel repair. My knowledge of opening up and closing spotwelded parts is very limited. But after a little experimentation, the drilling and opening of the spotwelded outer side of the channel went well. Next step is to fabricate the new outer side and adjust it. Struggeling to think reasonable from time to time, I will also remove the left front wing and do the repair parallell on both sides. Seeing my slave (Fürsten) producing repairpanels like he never done anything else, I can see a shimmer of light in the tunnel of rust...

Finally some hammering


After beeing a "cruiser" for two seasons, and only working on "bolt on" options and fine tuning of my Ex Ruby Red, it was a relief to take a firm grip of the hammer and dolly again. The Ruby Red went through serious sheetmetal work on the roof and gutter, so the noise of the hammer and dolly felt somehow familiar to me =)
The Zwitter had a front incident at least one time, and the straightening job was finished when the hood could be closed.
After some massage of the inner wing, I only have to weld in some small pieces and it will look a lot better. Some small battlescars will still be visable, but that's just for the image =)

Thursday, November 09, 2006

Running board off


I tried the same procedure as on the fender to remove the running board on the right side. Here I ended up with one broken bolt, not too bad. Seeing how solid the heater channel was underneath, made me even happier. The welding job of the front end and the rear end of the heater channel does not look to bad. Some parts from Wolfparts are needed to complete this. The runningboard it self is beyond saving. I kept it to copy the support bracket, which is needed to get the authentic look to the new runningboards. This is heavily supervised by Fürsten, who does not allow any short cuts. I will obey =)

Fender off


I removed the OG zwitter trim from the body, and have stored it safely. They are really the pride and joy of the car, along with the OG window trim. Then I started to remove the front right fender. I have given all the bolts 3 rounds of WD40 since july. They all seemed soaked in rust solvent when I started today. To be sure I gave the bolts some heating, and some light hammering, before trying to turn them. The result was 2 loose bolts, the rest broke off. A little frustrating, but what can you do? The solution will be drillig them out, and try to etablish new threads. If not, I will drill out the spotwelds on the welding nuts and replace them. The fender it self need a little welding, but beeing a OG split fender, it looked very nice. Removing the fender revealed no surprises otherwise, and I'm happy.

At last - stripping down


Finally the day came, and I could open my toolbox and start working on my 52. There has been some hours put in to the club garage, and is was quite satisfying to start working in these surroundings. We still have some pices to get in place, but overall it starts to look like a real work shop. I started to strip of the bumpers, and found out that the car had an accident in both the rear and the front. It look like this happend in the 50 ies while the car was still Swedish. Maybe it was fixed up from a "wreck", painted and sold to Norway??

New kid in town


"This town ain't big enough for the both of us..." but the barn sure is =) Surprisingly big enough to fit several splits. Took off a little erlier from work today, to get a good look at the new purchase of oval 57 in daylight. He used the whole weekend driving to get get this split (and anoher one) home from the west coast of Norway. It sertainly look like he found a nice piece of machinery this time. The car is quite rusty, but oh so beautiful patina... I hear some whispering about Oval 57 driving around in a RAT looking split in the near future =) Of course, he has to learn "How to recreate 1/3 of a split beetle" before he can hit the road.

Tuesday, November 07, 2006

Engine building


Last winter I buildt this 1600 DP engine for my Ruby red 66. It was all stock inside with some collected 70 ies tuning parts. A weber DCN bolted to a Trimco manifold, a Mallory dualpoint distributor, a power pulley and a glaspack muffler and header was "bolt on" parts.
I also ordered a custom made chromed stack for the weber from Pierce manifolds in the US. Unfornately the weber didn't play along when I fired the engine a week before Bug Run. All parts was changed back to stock, and in the 12 th hour I found that the problem was a broken push rod. The time was not there to tear the engine down again, and I drove the whole summer with the stock setup. The car with the 1600 was sold this autumn. BUT all the good parts is still laying on the shelf, waiting to be used again. This time I'm thinking more in the direction of a 30 Hp to start with...(another posting on future dreams, awaiting the workshop to be completed)